5G Window Treatment Kit
$76.78 – $345.29
Product Details
In the home, there are two interconnected issues, yet they need to be approached separately. The first is protection from 5G network milliwave infiltration in the home. The second is the EMFs created in the home. See also Tachyon Toolbox Against 5G Cellular Dangers & Risks.
Tachyon Window Treatment Kit.
Start with protection from 5G network milliwave infiltration. Take your time reviewing this information, as it is a new tool for the planet and is unlike anything you have ever likely been exposed to.
Tachyon Window Kit Solution:
Installing Tachyonized Window Treatment Kits harmonizes the 5G millimeter waves.
Still, more importantly, they expand the individual's energetic system every time they look out the window. For those that are sensitive, this is typically an expanding energy experience. For those that are not, it is still highly effective. Using Tachyonized Window Treatment Disks is a keyway to continually re-charge with every look, which is the key to Thriving In the 5G World.
Window Kit Solution:
Installing Tachyonized Window Treatment Kits harmonizes the 5G millimeter waves.
Still, more importantly, they expand the individual's energetic system every time they look out the window. For those that are sensitive, this is typically an expanding energy experience. For those that are not, it is still highly effective. Using Tachyonized Window Treatment Disks is a keyway to continually re-charge with every look, which is the key to Thriving In the 5G World.
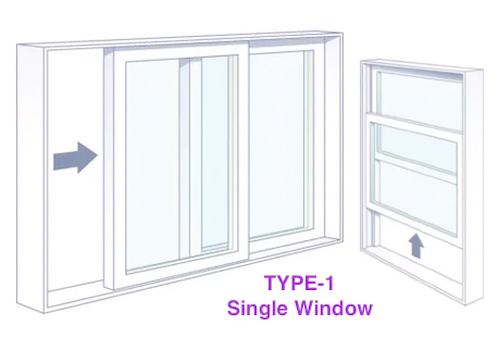
First, Identify your window type. Then count the number of windows you wish to protect. Finally, select the correct Tachyon Window kits. Installation is very easy.
Read on:
The claimed value behind 5G originates from its ability to use a considerably broader spectrum at higher frequencies. Out of all the building materials, glass is the easiest for 5G millimeter wave technology to penetrate. Therefore glass windows represent a significant issue in our homes, offices, and even our cars. We must address the window issue seriously.
We have developed:
We have evolved the perfect tools for the job. The Tachyonized Window Kits affect both the millimeter waves and your overall energy balance.
Understanding How It Works:
I developed the Tachyonized Window Kit as a unique system with deep roots in the global study of consciousness and energy expansion. In both the scientific and esoteric worlds, consciousness has regularly been the topic of research and studies. One commonly agreed insight is consciousness, expands from the body into the energetic flux of the human system. As an example, imagine an individual looking through a window searching for a person in a crowd. Their awareness expands (through the window) guided by their senses within the sea of possibilities to identify the energetic signature of the sought person. The experience is relayed throughout their energetic system on its way to resolving a sound interpretation, often concluding with a rationalized conclusion.
Understanding how the Tachyon Window Kit helps us Thrive in the 5G World!
Imagine what happens when we install a Tachyon Window Kit. As their awareness expands through the kitted window, the Tachyon disks expand the individual's entire energy system, strengthening the entire system as it balances disharmonies.
In workshop environments, I have shared this discovery with hundreds of individuals. We typically compare two windows, one Tachyon kitted window and one standard. For those sensitive, their descriptions of the differences have a commonality. Most describe an energetic expansion, seeing a color intensity, a peacefulness, and a sense of well being.
And yes, installing Tachyonized Window Treatment Kits harmonizes the 5G millimeter waves. Still, more importantly, they expand the individual's energetic system every time they look out the window. For those that are sensitive, this can be dramatic. For those that are not, it is nonetheless just as effective. Their experience will be witnessed in actions and health.
Installing Tachyonized Window Treatment Disks is a key-way to continually re-charge with every look, which is crucial to Thriving In the 5G World.
TYPE 1 - Sliding Windows and Doors (horizontal and vertical)
You've identified the windows you use most and are ready to install the Tachyon Window Treatments. Installation is a few simple steps away. The average installation time is 5 minutes per window.
Once completed, congratulations are in order. You have taken a substantial in-home step towards thriving in a 5G world.
Make sure you have the necessary tools:
- 2 ULTRA window treatment disks (one window kit)
- tape measure
- cleaning supplies to clean the area
Vertical Sliding Window Installation Instructions | |
1. Take a moment and place (do not stick yet) the Window Disks symmetrically off-center on the chosen window/sliding door (installation area). Make sure the window/door will continue to operate as expected. (see sample pictures below) 2. Next, clean and dry the installation area with soap and water, removing all dirt. This will ensure a strong bond. 3. Carefully peel off the white adhesive back, and adhere to the selected installation area. You can orientate the logo so it faces you. 4. Next, take a moment and put firm pressure on the disk to ensure a good connection between the adhesive and installation spot.
|
Horizontal Sliding Window Installation Instructions | |
|
1. Make sure you have a tape measure and the ability to clean the surface area before beginning. You will be using the exposed end of the sliding window.
|
Sliding Glass Door Installation Instructions | |
|
1. Make sure you have a tape measure and the ability to clean the surface area before beginning. You will be using the exposed end of the sliding glass door. Make sure you are using the door and not the frame.
|
Typical Sliding Window Image 1 | Typical Sliding Window Image 2 |
|
|
Typical Sliding Window Image 3 | Typical Sliding Window Image 4 |
|
|
5G Window Treatment Kit - TYPE 1
Horizontal Opening Sliding Window
1. Make sure you have a tape measure and the ability to clean the surface area before beginning. Typical height of the windows ranges from 24” to 60”. You would need to measure the height of your window and divide that number by 3.
2. Now, measure from the bottom of the window up 1/3 of your windows height and wipe down the area of any dust before placing the ultra disk. This will ensure a strong bond. Be aware of any handles or locking device
and adjust placement to ensure the disk is applied to the window itself.
3. Carefully peel off the white adhesive back and adhere to the selected installation area. Next, take a moment and put firm pressure on the disk to ensure a good connection between the adhesive and installation spot.
4. Measure 1/3 of your windows height from the top-down, clear of dust, and place the second ultra disk. The window will be able to slide easily and will be protected.
EXAMPLE:
Your window measures 36" inches. Divide 36” by 3 = 12" inches.
Put the first ultra disks 12 inches from the bottom and the second ultra disk 12 inches from the top.
Vertical Opening Sliding Window
1. Take a moment and place (do not stick yet) the ultra disks symmetrically off-center on the chosen window (installation area). Be aware of any handles or locking device to make sure the window will continue to operate as expected.
2. Next, clean and dry the installation area with soap and water, removing all dirt. This will ensure a strong bond.
3. Carefully peel off the white adhesive back and adhere to the selected installation area. You can orientate the logo so it faces you.
4. Next, take a moment and put firm pressure on the disk to ensure a good connection between the adhesive and installation spot. The window will be able to slide easily and will be protected.
Sliding Glass Door
1. Make sure you have a tape measure and the ability to clean the surface area before beginning. You will be using the exposed end of the sliding glass door. Make sure you are using the door and not the frame.
2. You would need to measure the height of your door and divide that number by 3. Now, measure from the bottom of the door up 1/3 of your doors height and wipe down the area of any dust before placing the ultra disk. This will ensure a strong bond. Be aware of any handles or locking device and adjust placement to ensure the disk is applied to the door itself.
3. Carefully peel off the white adhesive back and adhere to the selected installation area. Next, take a moment and put firm pressure on the disk to ensure a good connection between the adhesive and installation spot.
4. Measure 1/3 of your doors height from the top down, clear of dust, and place the second ultra disk. The door will be able to slide easily and will be protected.
Once completed, congratulations are in order.
You have taken a substantial in-home step towards thriving in a 5G world.
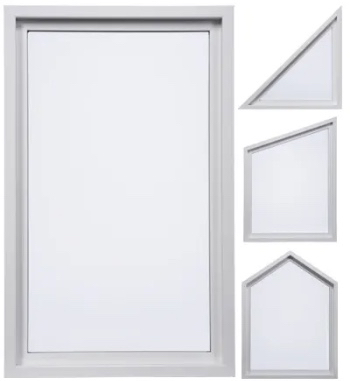
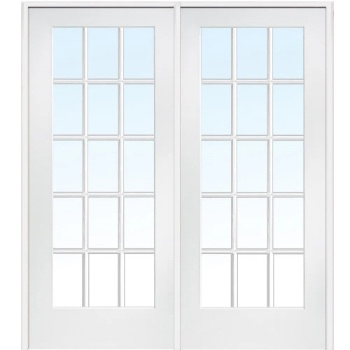
TYPE 2- French Doors, Picture and Crank type Windows
TYPE 2 - French Doors, Stationary, Picture, and Crack type Windows
You've identified the windows/doors you use most and are ready to install the Tachyon Window Treatments. Installation is a few simple steps away. The average installation time is 5 minutes per window.
Once completed, congratulations are in order. You have taken a substantial in-home step towards thriving in a 5G world.
Make sure you have the necessary tools:
- 4 window treatment disks (one window kit)
- tape measure
- cleaning supplies to clean the area
Crack Open Window Installation Instructions | |
|
1. Slide the disk in between the crack of the frame and the window itself. If the window can still close the disks will fit snugly inside and you can proceed. (see sample pictures below)
|
French Door Installation Instructions | |
|
1. Slide the disk in between the crack of the frame and the door itself. If the door can still close the disks will fit snugly inside and you can proceed. (see sample pictures below)
|
Stationary Window Installation Instructions | |
|
1.You will be placing the window disk on the window frame itself on both sides. Measure the height of the window and divide that number by 3.
|
TYPE-2 Window/Door Image 1 | TYPE-2 Window/Door Image 2 |
|
|
TYPE-2 Window/Door Image 3 | TYPE-2 Window/Door Image 4 |
|
|
Crack Open Window
1. Slide the disk in between the crack of the frame and the window itself. If the window can still close the disks will fit snugly inside and you can proceed.
2. Once confirmed the disk will slide in, open the window wide enough for you to be able to measure along the frame. You will be placing the window disk on the frame itself. Measure the height of the window and divide that number by 3.
3. Now, measure from the bottom of the window up 1/3 of your windows height and wipe down the area of any dust before placing the disk. This will ensure a strong bond.
4. Make sure the "energy flows out this side" is facing you and adhere the first disk to the selected installation area. Take a moment and put firm pressure on the disk to ensure a good connection between the adhesive and installation spot.
5. Next, measure 1/3 of your windows height from the top down, clear of dust, and place the second disk there. Again, make sure the "energy flows out this side" is facing you.
6. Repeat steps 4 and 5 on the other side of the window frame. Make sure energy side flows out again towards you and ensure the disks are as aligned as possible in order to create ULTRA experience. Measuring to the inch is the best way to place the disks as accurately as possible.
7. Close the window and confirm it will be able to fully close. The disks should not prevent it from closing fully.
Stationary Window
1.You will be placing the window disk on the window frame itself on both sides. Measure the height of the window and divide that number by 3.
2. Now, measure from the bottom of the window up 1/3 of your windows height and wipe down the area of any dust before placing the disk. This will ensure a strong bond.
3. Make sure the "energy flows out this side" is facing you and adhere the first disk to the selected installation area. Take a moment and put firm pressure on
the disk to ensure a good connection between the adhesive and installation spot.
4. Now, measure 1/3 of your windows height from the top down, clear of dust, and place the second disk there. Again, make sure the "energy flows out this side" is facing you.
5. Repeat steps 3 and 4 on the other side of the window frame. Make sure energy side flows out again towards you and ensure the disks are as aligned as possible in order to create ULTRA experience. Measuring to the inch is the best way to place the disks as accurately as possible.
French Door
1. Slide the disk in between the crack of the frame and the door itself. If the door can still close the disks will fit snugly inside and you can proceed.
2. Once confirmed the disk will slide in, open the doors wide enough for you to be able to measure along the frame. You will be placing the disks on the door frame itself on both sides.
3. Measure the height of the door and divide that number by 3. Next, measure from the bottom of the door up 1/3 of your doors height and wipe
down the area of any dust before placing the disk. This will ensure a strong bond.
4. Make sure the "energy flows out this side" is facing you and adhere the first disk to the selected installation area. Take a moment and put firm pressure on the disk to ensure a good connection between the adhesive and installation spot.
5. Now, measure 1/3 of your doors height from the top down, clear of dust, and place the second disk there. Again, make sure the "energy flows out this side" is facing you.
6. Repeat steps 4 and 5 on the other side of the door frame. Make sure energy side flows out again towards you and ensure the disks are as aligned as possible in order to create ULTRA experience. Measuring to the inch is the best way to place the disks as accurately as possible.
7. Close the door and confirm it will be able to fully close, the disk should not prevent it from closing fully.
Once completed, congratulations are in order.
You have taken a substantial in-home step towards thriving in a 5G world.
These are the choices...
Kit Type | Type 1 Kit – Single Window, Type 1 Kit – Multiple Window, Type 2 Kit – Single Window, Type 2 Kit – Multiple Window |
---|
Only logged in customers who have purchased this product may leave a review.
Related products
-
Sale!
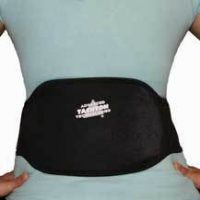
Tachyonized ULTRA Liberty Belt & Powerful X-Version
$194.95 – $326.95 Select options This product has multiple variants. The options may be chosen on the product page -
Sale!
Tachyonized Super DHA
$69.95 – $206.50 Select options This product has multiple variants. The options may be chosen on the product page -
Tachyonized Snuggy
$103.95 Add to cart -
Tachyonized Siberian Ginseng Tonic
$34.75 – $102.95 Select options This product has multiple variants. The options may be chosen on the product page -
Tachyonized 5-Inch 18-Sided Vogel Professional Wand
$1,064.00 Add to cart -
Tachyon Immune Strengthening Kit
$295.00 Add to cart -
EMF Ultra Pocket-Pro – Protecting from EMF and Energizes the System
$59.95 Select options This product has multiple variants. The options may be chosen on the product page -
Anti-Trauma Remedy
$34.95 Add to cart
Reviews
There are no reviews yet.